
If you are trying to fix a damaged No-Drill Blind, the good news is that many common problems can be solved without replacing the full blind. Most no-drill systems fail at the clip-in hardware, tension components, adhesive mounts, bottom rail end fittings, or operating controls long before the fabric or slats wear out completely. This guide explains which replacement parts are most commonly needed, how to identify the correct one, and when it makes more sense to repair versus replace the whole unit. In many cases, a simple no-drill blind replacement parts search on Amazon can solve a loose fit, sagging blind, or broken clip problem much faster than ordering a full new blind.
Buy No-Drill Blind Parts Online
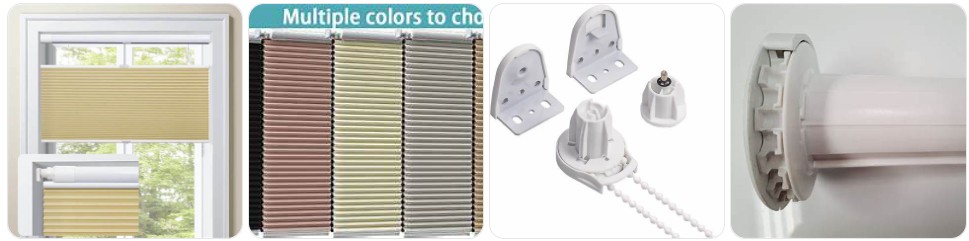
These are the primary mounting pieces that grip the window frame or sash without screws. When they crack, warp, or lose tension, the blind starts slipping, rattling, or leaning forward during use. » find on amazon / find on ebay
Some no-drill blinds rely on adhesive support plates or stick-on pads instead of mechanical clips alone. When the adhesive dries out or peels from warm glass or vinyl, replacing the mount pads restores holding strength. » find on amazon / find on ebay
On many no-drill pleated, cellular, or frame-fit blinds, small tension shoes keep the blind tracking neatly against the glass. Worn shoes or loose guide pieces cause rubbing, skewing, and uneven lifting along the sides. » find on amazon / find on ebay
End caps protect the rail edges and help keep clip-in blinds seated correctly. Missing or broken caps often make the blind feel loose in the frame, and they can also expose sharp rail ends. » find on amazon / find on ebay
Many cordless no-drill blinds use a pull tab or molded handle to raise and lower the blind without touching the fabric. Replacing a cracked handle helps prevent fabric creasing and uneven pulling during daily use. » find on amazon / find on ebay
Some no-drill cellular and pleated systems still use hidden internal cords or guide strings. Small guides and grommets reduce friction and keep the blind centered, so damaged ones can cause dragging, bunching, or crooked stacking. » find on amazon / find on ebay
A mixed repair kit is often the smartest first purchase if you are unsure which small piece failed. Kits commonly include clips, end caps, tabs, pads, and support hardware for quick no-drill blind fixes. » find on amazon / find on ebay
Signs You Need Replacement Parts for Your No-Drill Blind
- The blind slowly slides downward on the frame: If the blind no longer stays firmly attached and begins creeping down over a few days, the problem is usually worn clip brackets, weak adhesive pads, or a mounting plate that has lost grip rather than the blind fabric itself.
- One side sits lower than the other after installation: A no-drill blind that looks crooked right after fitting often has a bent clip, damaged tension shoe, or missing side guide. Before replacing the blind, inspect the mounting hardware and compare both sides carefully.
- The blind pops loose when you open the window or door: This is especially common on frame-mounted and sash-mounted no-drill systems. Repeated movement can fatigue the clips, so replacing the attachment hardware is often more effective than forcing the old pieces back into place.
- The adhesive mount keeps peeling away from uPVC or glass: If your stick-on support pad releases during warm afternoons or after cleaning, the original adhesive is no longer reliable. A fresh set of replacement adhesive mount pads usually solves this better than adding household tape.
- The bottom rail handle has cracked or fallen off: On cordless no-drill blinds, users often start tugging directly on the fabric once the handle breaks. That can distort the pleats or fray the material, so replacing the pull tab early prevents bigger damage.
- The blind rubs the frame every time it moves: No-drill systems depend on proper spacing and side guidance. If the blind scrapes the beading, drags against the glass, or starts bunching near one edge, a worn guide or missing end fitting is often responsible.
- You hear clicking, snapping, or plastic cracking at the top corners: Those noises usually point to stressed clip-in hardware rather than a failing shade panel. Do not keep forcing the blind up and down, because small cracks in the clips can quickly become complete breakage.
- The blind worked after installation but became unstable after cleaning: Moisture, degreaser, and aggressive wiping can loosen adhesive-based no-drill mounts. If the blind suddenly feels less secure after window cleaning, inspect the pads and mounting points before assuming the full blind is defective.
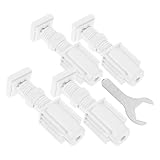
NUOBESTY No Drill Blind Brackets Louver Blind Mounting Brackets Clips Window Shade Replacement Parts Universal Fit 4pcs 1 Inch

SHINEOFI 4Pcs No Drill Window Blind Brackets Easy Install Holders for Blinds for Home Office and Bedroom Damage
How to Identify the Right No-Drill Blind Replacement Part
- Start with the mounting method first: Check whether your blind is held by clip-on brackets, adhesive pads, or a combined frame-fit system. A part that fits a stick-on blind will often not fit a clip-in blind, even if the blind looks almost identical from the front.
- Match the failed side before ordering pairs: If only the left clip, right guide, or one end cap is damaged, compare the working side carefully for shape, slot placement, and rail depth. This is one of the easiest ways to avoid buying the wrong no-drill hardware.
- Measure the headrail or cassette, not just the blind fabric: No-drill parts usually attach to the blind’s top or bottom rail, so the rail width and profile matter more than the fabric width. A few millimeters can make the difference between a secure clip and a useless replacement.
- Look at how the part touches the window frame: Some no-drill clips hook over the sash edge, while others clamp within the rubber-beaded area or stick directly to glass. When browsing no-drill blind clip brackets on Amazon, match the contact style as closely as possible.
- Check whether your blind is cordless, guided, or tensioned: A cordless pull-down blind may need handles, internal guides, or bottom rail fittings, while a tensioned window-fit blind may need side shoes or guide wire hardware. The operating style tells you which small parts matter most.
- Inspect for sun damage and plastic color aging: On no-drill blinds, faded white plastic often becomes brittle long before it visibly breaks. If one piece has snapped from age, related plastic components near it may already be close to failure and worth replacing together.
- Buy a repair kit when the exact part name is unclear: If you know the failure is somewhere in the mounting or rail hardware but cannot identify the individual piece, a no-drill blind repair kit is often the most practical first step.
Should You Repair or Replace the Whole No-Drill Blind?
In most cases, you should repair a no-drill blind when the problem is limited to the mounting system, side guides, pull handle, end caps, or other small hardware. These blinds are specifically chosen for easy fitting and low-damage installation, so it makes sense to preserve the main blind if the fabric, slats, or rail body are still in good condition. A loose mount, cracked clip, or failed adhesive pad usually costs far less to fix than replacing the entire unit, especially if the blind still opens and closes correctly once supported. For many households, starting with replacement no-drill blind parts is the most cost-effective move.
You should consider replacing the whole no-drill blind when the fabric is badly warped, the headrail is bent, the internal lifting system is damaged in several places, or the blind no longer fits securely because the overall frame design has failed. It is also worth replacing the full blind if you have already repaired the mounting points once or twice and the structure still shifts during daily use. In that situation, upgrading to a new no-drill blind on Amazon may be more reliable than chasing multiple small failures. The key test is simple: if the blind body is still sound, repair it; if the main operating structure is compromised, replace it.
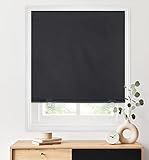
LazBlinds 100% Blackout Roller Shades, No Tools No Drill Cordless Blinds for Windows, Thermal Insulated UV Protection Privacy Window Shades for Bedroom (36''W x 72''H, Black)

Window Blinds Cordless Blackout No Drill Cut to Size Clip On Stick On Self Adhesive Temporary Blinds Pleated Paper Blinds for Windows Doors Shades for Home Nursery Bedroom Kitchen Bathroom

Window Blinds Cordless No Drill Cut to Size Clip On Stick On Self Adhesive Temporary Blinds Pleated Paper Blinds for Windows Doors Shades for Home Nursery Bedroom Kitchen Bathroom
How to Prevent Parts Damage to No-Drill Blind
- Clean around the mounting points gently: No-drill blinds often rely on clips, pads, or pressure-fit supports that can loosen if you scrub too aggressively around them. Use a light touch near the top corners and avoid soaking adhesive-backed hardware during window cleaning.
- Lift and lower the blind from the intended handle area: If your no-drill blind has a pull tab or molded grip, use that exact point every time. Pulling from one fabric edge twists the rail, stresses the clips, and wears the guide components unevenly.
- Check clip tension after seasonal temperature changes: Heat and cold can slightly change how no-drill brackets grip vinyl, aluminum, or glass-adjacent surfaces. A quick inspection after summer or winter helps you catch loosening hardware before the blind drops unexpectedly.
- Do not overload adhesive mounts with repeated repositioning: Many people remove and re-stick no-drill mounts several times while aligning the blind. That weakens the bond. If a pad has already been lifted, replace it with fresh adhesive mount pads instead of reusing it.
- Keep the window frame surface dust-free: Dust, grease, and cleaning residue reduce how well no-drill parts grip the frame. A clean, dry contact surface helps clips stay tight and keeps stick-on supports from peeling prematurely.
- Avoid forcing the blind past resistance: If a no-drill blind suddenly feels tighter, catches at one side, or starts clicking, stop and inspect the guides and brackets. Forcing movement is one of the fastest ways to break plastic no-drill hardware.
- Replace small cracked parts early: A tiny split in a clip bracket or end cap may seem harmless, but no-drill systems spread load through small contact points. Replacing one inexpensive piece early often prevents the entire blind from dropping or misaligning later.
No-Drill Blind Parts FAQ
What is the most commonly replaced part on a no-drill blind?
The most commonly replaced part is usually the mounting hardware, especially clip brackets or adhesive support pads. These pieces carry the installation load, so they wear out faster than the blind fabric or slats. A quick search for no-drill blind clip brackets is often the best place to start.
Can I replace the clips without taking down the whole no-drill blind?
Sometimes yes, but it depends on the design. Some clip-in blinds allow you to release one side carefully and swap the hardware, while others need the blind removed first so the replacement clip can be seated properly and safely.
Are no-drill blind parts universal?
No. Some small pieces look similar, but no-drill blinds vary by rail shape, frame contact style, adhesive system, and operating design. Always compare the existing part’s shape and the blind rail measurements before ordering replacements.
Should I replace the adhesive pad or just add stronger tape?
Replacing the original pad is usually the better solution. Extra household tape often adds thickness, reduces proper seating, and can make the blind sit unevenly. Purpose-made replacement adhesive pads for no-drill blinds tend to hold more reliably.
When should I buy a repair kit instead of one single part?
A repair kit makes sense when you are not fully sure which small hardware piece failed, or when multiple plastic components are worn at once. For older blinds, a no-drill blind repair kit can save time and avoid repeat orders.
Can a no-drill blind be repaired if it keeps falling off the window?
Yes, often it can. Repeated falling is commonly caused by weak clips, brittle end fittings, dirty contact surfaces, or expired adhesive pads rather than a ruined blind. Inspect the mounting system closely before deciding the whole blind needs replacement.

60 PCS Vertical Blind Repair Tabs Kit Clear Fixer Verticle Blinds Snap in Replacement Slats Parts Panels

30 Sets (60 Pcs) Vertical Blinds Replacement Slats Panels, Vertical Blind Repair Tabs Kit, Clear Apartment Blinds Replacement Fixers, Horizontal Blinds Replacement Parts
