
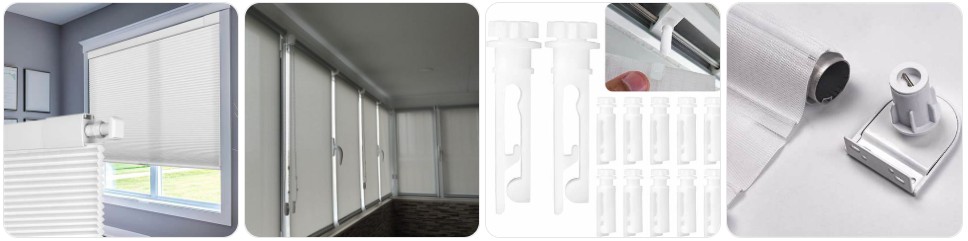
No-Drill Blinds are designed to fit without screws, which means repairs often involve clip-on brackets, adhesive mounts, tension systems, snap-in headrails, frame grips, end caps, cordless controls, or compact roller and pleated mechanisms rather than traditional drilled hardware. The quick answer is that a broken no-drill blind can often be repaired for much less than a full replacement if the blind fabric or slats are still in good condition and the main issue is limited to the fitting system or control hardware. In many cases, the fix comes down to replacing a worn clip, tightening or re-seating the headrail, swapping a broken bracket, replacing a small control part, or restoring the fit so the blind sits level again. If you want to compare useful parts while troubleshooting, it helps to browse no-drill blind repair kits, no-drill blind brackets, and adhesive blind mounting brackets.
Fix Common No-Drill Blind Problems & Repair Cost
The blind keeps slipping or dropping out of place: This is one of the most common no-drill blind problems and usually points to worn clip-fit brackets, loose tension fittings, weak adhesive pads, or a headrail that is no longer seated securely in the frame. Because no-drill blinds rely on pressure, clips, or adhesive instead of screws, even a small loss of grip can make the whole blind feel unreliable. In many cases, replacing the bracket set or refreshing the mounting system is enough to solve the problem, and minor repairs are often in the range of about $5 to $25 in parts, while a more complete re-mounting setup can run around $15 to $40 depending on the system. It helps to compare no-drill blind brackets and adhesive blind mounting brackets. Do not keep pushing the blind back into place without fixing the actual fitting issue, because that often weakens the mount even more.
The blind sits crooked or hangs unevenly: If one side hangs lower or the blind no longer looks square in the frame, the problem is often a shifted bracket, uneven clip pressure, a distorted adhesive mount, or a control side that is no longer supported properly. On no-drill blinds, alignment matters a lot because the fitting system is usually lighter-duty than a screwed-in bracket system. Depending on the cause, the repair may be as simple as re-seating the blind or replacing one damaged mounting point, but it is worth correcting early before the mechanism starts rubbing or twisting.
The blind will not raise, lower, or tilt smoothly: This usually means the control hardware, cordless mechanism, chain unit, or internal roller part is wearing out rather than the no-drill mount itself. On no-drill roller and pleated systems, the operating components can be compact and brand-specific, so it helps to compare roller shade clutch replacements, blind cord lock replacements, or compatible control parts before assuming the whole blind is finished.
The adhesive or clip-fit mount has failed in one corner: This is especially common in kitchens, bathrooms, rental flats, and sunny windows where heat, humidity, or repeated movement gradually weakens the fitting method. If the blind body is still fine, replacing the mount or clip system is usually much cheaper than replacing the entire blind.
The blind worked at first but now rubs, binds, or catches: This often means the blind has shifted slightly out of alignment, one support point is loose, or the fitting system is no longer holding the headrail square. On no-drill blinds, small fitting changes can quickly affect how the blind moves.
No-Drill Blind Repair Kit
A no-drill blind repair kit is most useful when the problem is clearly in the mounting system or small control hardware rather than in the main blind fabric or slats. Because no-drill blinds can use clip-fit, adhesive, tension, snap-in, or frame-mounted systems, the parts that fail most often are the brackets, fitting clips, end caps, small control units, adhesive pads, and stabilizing hardware that keep the blind level and secure. A good repair kit may include replacement brackets, fresh adhesive mounting pieces, clip hardware, end fittings, or small mechanism parts that help restore the blind without needing a full new unit.
It is worth checking kit photos carefully because many compatible items are sold under broader names like easy fit blinds, adhesive blinds, clip fit blinds, or no-tools blinds instead of using the exact phrase no-drill blind. If the problem is limited to one obvious piece, buying that exact part may be cheaper. But if the blind is loose in the frame, sitting crooked, and also showing wear in the control side, a broader no-drill blind repair kit or a set of no-drill blind brackets can make the fix much more consistent. For no-drill blinds, matching the fitting system matters just as much as matching the blind style.

60 PCS Vertical Blind Repair Tabs Kit Clear Fixer Verticle Blinds Snap in Replacement Slats Parts Panels

RecPro RV Electric Roller Shade Replacement Motor for Irvine Brand Roller Shades

Vertical Blinds Replacement Stem and Gear Used for Headrail, Carrier Stem Vertical Blinds Curtain Accessories(24 Sets)
Signs Your No-Drill Blind Need Repair
- The blind keeps slipping from the frame: This usually points to worn clips, weak adhesive, or a fitting system that no longer grips securely. Checking no-drill blind brackets is often a smart first step.
- One side hangs lower than the other: On a no-drill blind, uneven hanging often means the mounting points are no longer balanced or the headrail has shifted out of its proper position.
- The blind moves when you open the window or door: This is a clear sign that the blind is no longer fitting securely, especially on clip-fit and frame-mounted no-drill systems.
- The adhesive corners look loose or lifted: If the support points are peeling away, the blind may still work for a while, but the fitting system is already starting to fail.
- The blind rubs or catches during operation: If the mount is no longer square, it can make the blind feel like the mechanism is broken even when the real issue is alignment.
- The control side feels weak or unstable: If the chain, cordless handle, or operating side is straining because the blind is not sitting properly, it may help to compare clutch replacements as well as the mounting hardware.
- The blind looked fine at first but has gradually loosened: No-drill systems can shift over time, especially with repeated daily use, temperature changes, or moisture.
- The blind body still looks good, but the fitting no longer feels secure: This is often the ideal time to repair a no-drill blind, because the problem is still mostly mechanical or mounting-related.
Tools You May Need to Repair No-Drill Blind
- Measuring tape: A measuring tape helps you check bracket spacing, recess width, blind size, and the exact fitting area before ordering any replacement parts.
- Precision screwdriver set: A precision screwdriver set is useful for small covers, compact control units, and snap-in hardware on no-drill blinds that still use small mechanical fittings.
- Needle-nose pliers: A pair of needle-nose pliers helps with clips, tabs, end caps, and small retaining parts without damaging them.
- Replacement brackets or clips: If the blind is slipping or sitting unevenly, matching no-drill blind brackets or clip-fit parts may be the most important repair item.
- Adhesive mounting pads or strips: If your no-drill system uses adhesive supports, fresh adhesive mounting strips or compatible blind pads can help restore a more secure hold.
- Replacement control hardware: If the blind is mounted securely but the operating side is failing, compare roller shade clutch replacements, cord lock replacements, or matching cordless parts.
- Cleaning cloth and rubbing alcohol: A rubbing alcohol wipe or cloth helps clean the surface before fitting fresh adhesive parts, which is especially important on no-drill systems.
- A clean protected work surface: If the blind has to come down for repair, it helps to protect the fabric, slats, or frame while you inspect the fittings and control side.
Should You Repair or Replace Your Broken No-Drill Blind?
Repairing a broken no-drill blind usually makes sense when the blind fabric, slats, or shade body are still in good condition and the problem is clearly limited to the fitting system, brackets, adhesive mounts, or small control parts. Because no-drill blinds are often chosen for convenience, rentals, and damage-free fitting, a small failure in the clip or adhesive system can make the whole blind feel unusable even though the main blind is still perfectly serviceable. In that situation, replacing the failed mounting hardware or operating part is usually much cheaper than replacing the full blind, especially if all you need is a no-drill blind repair kit or fresh fitting brackets.
Replacement becomes the better option when the blind body itself is damaged, the mechanism is failing, the fitting system is worn out in several places, and the blind no longer suits the window or room. It may also make sense to replace the full blind if the original no-drill system was low quality and keeps failing even after small repairs. A quick comparison between no-drill blind options and the parts you need can help you decide. In many cases, though, no-drill blinds are worth repairing when the issue is in the fitting system rather than the blind body itself.

Window Blinds Cordless No Drill Cut to Size Stick On Temporary Paper Shades

AOSKY No Drill Cordless Blackout Cellular Shades, 34" W x 48" H, White

Window Blinds Cordless No Drill Cut to Size Clip On Stick On Self Adhesive Temporary Blinds Pleated Paper Blinds for Windows Doors Shades for Home Nursery Bedroom Kitchen Bathroom
Tips to Make Your No-Drill Blind Last Longer
- Do not keep pushing or snapping the blind back into place roughly: Repeated force can weaken clip-fit parts and distort the mounting system faster.
- Keep adhesive-mounted systems clean and dry: Moisture, grease, and dust can reduce the grip of the fitting points over time.
- Check the alignment regularly: A no-drill blind that starts sitting slightly crooked should be corrected early before it begins rubbing or straining the control side.
- Operate the blind gently: Sudden pulling puts more stress on lightweight no-drill brackets than on traditional screwed-in mounts.
- Do not ignore a loose corner: Replacing a worn no-drill bracket early is much easier than fixing a blind that has dropped completely.
- Clean the fitting surface before replacing adhesive parts: Fresh adhesive works much better on a clean surface than on dust, grease, or old residue.
- Check the control side when the blind starts catching: Sometimes the operating hardware looks like the problem, but the real cause is a mount that has shifted out of square.
- Store removed no-drill blinds carefully: If you take the blind down temporarily, protect the clips, adhesive pads, and control side so the fitting system is still usable when it goes back up.
No-Drill Blind Repairs FAQ
What usually breaks on a no-drill blind?
The parts that fail most often are the clip-fit brackets, adhesive mounts, end caps, fitting tabs, and small control parts. On no-drill blinds, the mounting system usually wears out before the blind fabric or slats do.
Can I fix a no-drill blind that keeps falling down?
Yes, in many cases. The most common causes are worn brackets, weak adhesive supports, or a headrail that is no longer seated properly. Replacing the fitting hardware is often enough to solve the problem.
Is a no-drill blind repair kit worth buying?
It can be, especially when the blind has more than one small hardware issue. A no-drill blind repair kit is often easier than sourcing brackets, adhesive parts, and small fittings separately.
Why is my no-drill blind sitting crooked?
This usually means one fitting point has shifted, one bracket is weaker than the other, or the blind is no longer seated squarely in the frame. Because no-drill systems rely on balanced support, even a small shift becomes very noticeable.
Can I replace just the brackets on a no-drill blind?
Yes, if the blind body and control system are still in good condition. Replacing the brackets is often one of the best-value repairs on a no-drill blind.
How much does it usually cost to repair a no-drill blind?
Minor repairs such as clips, brackets, adhesive parts, or small control fittings are often relatively inexpensive, usually around $5 to $25 in parts. Larger repairs involving several support points or control hardware may cost more, but they are still often cheaper than a full replacement.
Should I repair or replace a no-drill blind with repeated fitting problems?
If the blind itself is still in good condition and the fitting issue is clearly fixable, repair still makes sense. If the same no-drill system keeps failing repeatedly, replacement may be the better long-term choice.
Can no-drill blind parts be hard to match?
Sometimes, yes. Many parts are sold under adhesive blind, easy-fit blind, clip-fit blind, or no-tools blind terminology rather than no-drill wording, so it helps to compare measurements and product photos before ordering.