
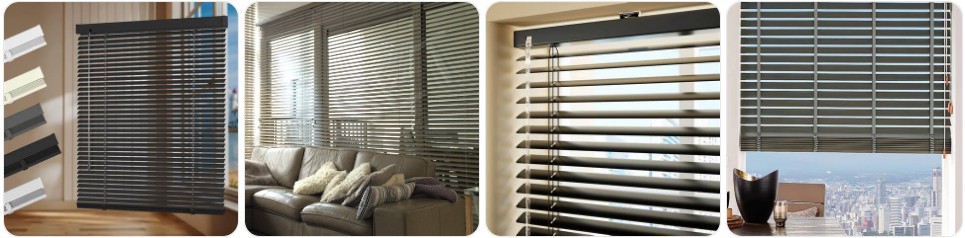
If you need to remove Venetian blinds without bending the slats, tangling the lift cords, or damaging the headrail brackets, the safest approach is to raise the blind, support the headrail evenly, and release the mounting hardware one side at a time. Venetian blinds are more rigid than fabric blinds, but the slats, tilt mechanism, and cord system can still be damaged if the blind is twisted or allowed to drop unevenly during removal. This guide walks through how to take down Venetian blinds step by step while protecting the slats, headrail, bottom rail, tilt controls, and cords. If you think you may need replacement hardware after removal, it can also help to review venetian blind parts before you begin.
What You Need Before Removing Venetian Blind
- A stable step stool or ladder: Venetian blinds are often mounted high inside a recess or above the window frame, so steady access makes it much easier to release the brackets without twisting the headrail.
- A small screwdriver: Many Venetian blind brackets have clip tabs, flap covers, or retaining doors that are easier to open with a precision screwdriver set, especially on tight recess fittings.
- Needle-nose pliers: A pair of needle-nose pliers can help if a bracket clip is stiff or a small retaining tab is awkward to grip by hand.
- A soft cloth or towel: Once the blind is down, it helps to place it on a clean surface so the slats do not get scratched, especially if you are working with aluminum or faux-wood Venetian blinds.
- A soft tie or strap: Use this to keep the slats gathered neatly after removal. Do not clamp the blind too tightly, because excessive pressure can bend slats or distort the ladder strings.
- A container for screws and clips: Keep all bracket pieces, covers, and small screws together so you do not lose anything if you plan to reinstall the same blind later.
- Optional replacement parts nearby: If the blind already shows signs of wear, you may want to compare venetian blind parts, venetian blind brackets, blind tilter replacements, or cord lock replacements before removal.
Venetian Blind Removal Guide
Venetian blind removal is usually straightforward once you identify the bracket style, but the blind should always be supported by the headrail rather than by the slats or cords. The safest method is to raise the blind fully, tilt the slats open so they are not under unnecessary pressure, and release the mounting clips carefully so the headrail comes away level. If the blind feels stuck, stop and inspect the brackets closely before pulling harder, because older Venetian blind fittings can be brittle and easy to crack.
- Raise the Venetian blind fully: Bring the blind into its compact stacked position so the slats are gathered at the top. This reduces the amount of loose material hanging down and makes the blind easier to handle safely.
- Tilt the slats open slightly: Opening the slats helps reduce pressure in the stack and makes the blind less likely to bind while you remove it.
- Remove any valance or front cover first: Some Venetian blinds have a decorative front valance or bracket cover that hides the mounting hardware. Remove that first so you can see the brackets clearly.
- Inspect the bracket style carefully: Look for front-opening doors, snap-in tabs, or top clips at each end of the headrail. Wider Venetian blinds may also have one or more center support brackets.
- Support the headrail with one hand: Before opening any bracket, hold the headrail firmly so it does not drop or twist. Never try to remove a Venetian blind by pulling on the slats or lift cords.
- Release the first bracket gently: Use your fingers or a small screwdriver to open the retaining flap or push back the release clip.
- Ease one side of the headrail free: Once the first bracket opens, move that side slightly forward or downward just enough to free it without forcing the other side out of alignment.
- Release the remaining brackets one at a time: Continue supporting the blind as you open the other brackets. On wider Venetian blinds, always check for center supports before trying to remove the rail completely.
- Lift the blind away evenly: When all clips are free, remove the blind in a level motion. Avoid letting one side hang much lower than the other, because that can twist the headrail or stress the ladder strings.
- Secure the blind loosely after removal: Place it on a clean flat surface and loosely wrap it with a soft tie so the slats stay stacked neatly without being crushed.
- Inspect the hardware while the blind is down: This is the best time to check the brackets, cords, tilt mechanism, wand hook, and bottom rail parts for wear. If something looks damaged, compare venetian blind parts, replacement brackets, tilter replacements, and blind string replacement kits.

2pcs Low Profile Wand Tilter Mechanism with 7/32" Hexagon Shaped Gear Hook Connection for Low Rail Horizontal Wood and Faux Wood Blinds headrail

Quadafy 2 Pack 17 inch Blind Wand, Vertical Blinds Replacement Parts

Detachable Blind Rods Blind Wands Replacement with Hook 24 Inches
Common Problems When Taking Down Venetian Blind
- The bracket door will not open: Venetian blind bracket flaps can be tighter than they look, especially on older metal or plastic fittings. Use a screwdriver carefully instead of forcing the headrail forward and cracking the bracket.
- The blind seems stuck in the middle: Wider Venetian blinds often have an extra center support bracket. Always check the full width before pulling harder on the rail.
- The slats start bending during removal: This usually happens when the blind is handled by the slats instead of by the headrail. Support the blind evenly and keep the slat stack raised while removing it.
- The lift cords tangle once the blind is down: Venetian blind cords are easy to knot if the blind is dropped onto a surface carelessly. Wrap them loosely after removal so they stay straight for reinstallation or repair.
- A bracket tab snaps: Older plastic fittings can become brittle over time, especially in sunny windows. If that happens, it may help to compare venetian blind brackets before reinstalling the blind.
- The tilt wand or tilter already looks worn: This is a common thing to notice once the blind is down, and it can be a good time to compare blind wand replacements or tilter replacements before putting the blind back up.
- The headrail no longer feels square after removal: This can happen if one side was released first and the blind twisted. Check the rail ends, ladder strings, and bracket fit before reinstalling it.
What to Do After Removing Venetian Blind
- Lay the blind on a clean, flat surface: Venetian slats should be kept away from dirt, moisture, and anything heavy that could bend the stack or scratch the finish.
- Check the slats before storing: If any slats are bent or out of line, straighten them gently before storage so the blind stays as even as possible.
- Inspect the headrail, cords, and brackets: Look for frayed lift cords, worn brackets, a damaged tilter, bent slat clips, or a loose wand hook. If needed, compare venetian blind parts, cord lock replacements, and tilter replacements.
- Clean the blind while it is off the window: It is much easier to dust the slats and wipe the headrail when the blind is already down and lying flat.
- Store the blind loosely secured: A soft tie around the raised blind helps keep the slats tidy, but leave enough space so the ladder strings and slats are not compressed too tightly.
- Keep all clips and screws together: If you are reinstalling the same blind, storing the hardware with the blind saves time and avoids mismatched fittings later.
- Decide whether to repair or replace: If removal exposed worn brackets, cords, or tilt hardware, compare venetian blind options with repair-part costs before reinstalling.

Cordless Room Darkening Venetian Blind - 35 Inch Width, 64 Inch Length, 2" Vinyl Slat Size - White - GII Luna Light Filtering Horizontal Mini Windows Blinds for Interior by Achim Home Decor

Calyx Interiors Cordless White 1” Light Filtering Mini Blinds 34” W x 60” H Window Blinds for Home, Vinyl Horizontal Blinds for Indoor Windows
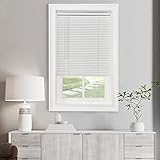
Cordless Light Filtering GII Morningstar Window Blind, 28 x 64 in, White
Venetian Blind Removal FAQ
Should Venetian blinds be fully raised before removing them?
Yes. Raising them into their compact stacked position makes them much easier to handle and helps protect the slats and cords during removal.
Why will my Venetian blind not come out of the brackets?
The most common reasons are a hidden retaining clip, a tight bracket flap, or an extra center support bracket that has not been released yet. Check the full width before forcing the headrail.
Can Venetian blinds be damaged during removal?
Yes. The most common damage is bent slats, tangled lift cords, twisted headrails, or cracked brackets caused by pulling on the wrong part of the blind instead of supporting the headrail.
Do I need to remove the brackets from the window too?
Not always. If you plan to reinstall the same blind and the brackets are still secure and in good condition, they can often stay in place.
What if a Venetian blind bracket breaks during removal?
It is usually best to replace the broken bracket before reinstalling the blind. Reusing cracked or bent fittings can make the blind unstable and harder to remove next time.
Can I reinstall the same Venetian blind after taking it down?
Yes, as long as the slats, headrail, cords, and brackets are still in good condition. Removal is also a good time to clean the blind and replace any small worn parts first.
Is it better to repair a Venetian blind while it is off the window?
Usually, yes. It is much easier to inspect the headrail, tilter, cords, brackets, and slats when the blind is down and resting on a flat surface.
Are Venetian blind brackets universal?
Not always. Venetian blind fittings can vary by brand, headrail size, and installation style, so it is a good idea to compare the old bracket carefully before ordering replacements.
Summary
Removing Venetian blinds safely is mostly about supporting the headrail properly, releasing the mounting clips in the right order, and protecting the slats, cords, and tilt hardware from twisting or bending while the blind comes down. Once the blind is off the window, you can inspect the brackets, cords, headrail, and slats, clean the blind more easily, and decide whether it is ready to be reinstalled or needs new hardware first. If your removal project turns into a repair job, it also helps to review repair venetian blinds before putting the blind back up.

60 PCS Vertical Blind Repair Tabs Kit Clear Fixer Verticle Blinds Snap in Replacement Slats Parts Panels

#560 Universal Roller Shade Replacement Parts, Roller Blind Fitting Repair Kit for 1.5"(38mm) Tube with R16 Clutches, Metal Bracket, and End Plug
