
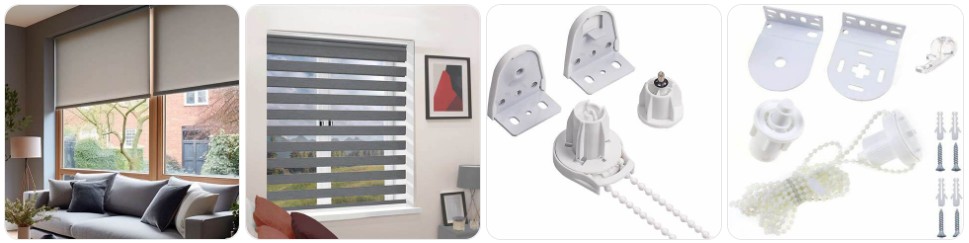
Daylight Blinds use layered or striped fabric and a roller-style control system to soften glare while still keeping a room bright, so the most common replacement parts are usually the clutch, chain, brackets, idle end, bottom bar caps, and tube fittings rather than the fabric itself. If your blind still rolls smoothly and the striped bands are in good condition, replacing the failed hardware is often the fastest and cheapest fix.
Buy Daylight Blind Parts Online
The clutch is the main control unit that lets the blind raise, lower, and align the alternating sheer and solid bands correctly. When it slips, jams, or skips, the blind usually rolls unevenly or stops at random points. » find on amazon / find on ebay
A broken or stretched beaded chain makes it hard to position the blind precisely, especially when you want the daylight stripes to line up neatly. Replacing the chain restores smoother travel and better control without changing the entire blind. » find on amazon / find on ebay
Daylight blinds rely on secure brackets to keep the roller tube level so the striped fabric tracks straight. Bent, cracked, or loose brackets often cause sagging, rubbing, or poor alignment across the full width of the blind. » find on amazon / find on ebay
The idle end supports the opposite side of the roller from the clutch and keeps the tube balanced. If it wears down or snaps, the blind can lean to one side and the layered fabric bands may stop overlapping properly. » find on amazon / find on ebay
Tube inserts connect the clutch or idle end to the roller tube and are easy to overlook during repairs. If the insert cracks or slips inside the tube, the blind may turn inconsistently or stop lifting under load. » find on amazon / find on ebay
End caps on the bottom rail help the fabric hang square and stop the bar from shifting during operation. Missing caps can make the blind look crooked, drag against the frame, or damage the lower stitched edge. » find on amazon / find on ebay
A repair kit is ideal when you are not yet sure whether the clutch, chain, bracket, or idle end is the failed piece. Good kits bundle several of the most common wear items used in layered daylight blind repairs. » find on amazon / find on ebay
Signs You Need Replacement Parts for Your Daylight Blind
- The alternating bands no longer align evenly: If the Daylight and solid stripes stop matching up correctly during opening and closing, the problem is often a worn clutch, loose tube insert, or shifting idle end rather than the fabric itself.
- The blind rolls up with one side higher than the other: Daylight blinds depend on a level roller so the fabric layers stay synchronized. A bent bracket, damaged idle end plug, or missing end cap can make the bottom bar rise unevenly.
- The chain moves but the fabric barely responds: When the beaded chain still turns but the blind slips or stalls, the internal clutch teeth may be worn. That is a very common failure point on heavily used Daylight blinds in living rooms and patio doors.
- You hear clicking, grinding, or skipping while adjusting light: A healthy Daylight blind should move with a steady, controlled feel. Repeated clicking usually means the clutch or tube adapter is no longer gripping correctly inside the roller tube.
- The fabric bands drift out of position after you stop pulling: If the blind slowly settles on its own and loses the exact open-or-closed stripe position, the control mechanism is slipping under weight and usually needs a new clutch mechanism.
- The bottom bar taps the window frame during operation: This is often a sign that the roller is not sitting square in the brackets anymore. On Daylight blinds, even a small angle change can disrupt how the striped layers pass each other.
- The blind cannot stop at the “sheer” setting cleanly: If you cannot hold that in-between daylight-filtering position anymore, check for a worn chain connector, stretched chain loop, or damaged bracket that lets the tube shift under tension.
- One side of the blind sags when fully lowered: Because Daylight blinds use a layered fabric wrap, sagging is more often linked to missing support hardware than to fabric stretch alone. Check the idle end and tube insert first before replacing the whole blind.

Vercraft 2 Pcs Vertical Blind Wand Control Replacement Repair Accessories White Window Blinds Replacement Parts

60 PCS Vertical Blind Repair Tabs Kit Clear Fixer Verticle Blinds Snap in Replacement Slats Parts Panels
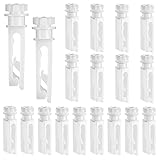
Vertical Blind Replacement Parts Repair Tabs White Stems for Window Carrier Vertical Blinds Curtain Accessories(12 Pieces)
How to Identify the Right Daylight Blind Replacement Part
- Check whether your blind is a true Daylight / day-and-night striped roller system first: The right parts depend on the blind using alternating sheer and solid bands wrapped around a roller tube. If your blind has that layered striped fabric design, you should compare against clutches, idle ends, chains, and tube inserts, not slat hardware.
- Measure the roller tube before buying any control parts: On Daylight blinds, the clutch and idle end usually fit a specific tube diameter. Measure the outside of the tube and compare it carefully before ordering a tube insert or clutch replacement.
- Match the bracket shape as well as the width: Some Daylight blind brackets are top-fix, some are face-fix, and the slot shape can differ between brands. If the bracket does not hold the clutch side and idle side square, the striped fabric will track badly even if the blind technically fits.
- Look at which side the chain control is on: If your current chain hangs on the left side, buy a compatible left-side control setup; if it hangs on the right side, match that orientation. This matters because many Daylight blind clutches are side-specific.
- Inspect how the bottom bar is finished: Some Daylight blinds use slim bottom rails with small end caps, while others use wrapped bars with hidden weights. Matching the lower hardware keeps the blind hanging straight so the light-filtering bands stay visually even.
- Use the failed symptom to narrow the part faster: If the chain is broken, start with a beaded loop or chain connector. If the blind leans, start with the idle end or brackets. If it slips under tension, start with the clutch. That symptom-based approach usually saves time and avoids ordering the wrong part.
- Compare photos of the old part before you buy: Daylight blind components can look similar across listings, but the internal tooth pattern, square drive, and hook shape often differ. A side-by-side comparison with an online repair kit listing photo helps prevent mismatches.
- Replace heavily worn paired parts together when possible: If the clutch has failed after long use, the chain and bracket may also be worn. On older Daylight blinds, replacing the working side only can leave the blind tracking unevenly because the opposite side has already loosened.
Should You Repair or Replace the Whole Daylight Blind?
In many cases, you should repair the blind rather than replace it if the striped fabric is still clean, flat, and not fraying at the edges. Daylight blinds are often discarded because the control side stops working, but the actual failure is usually a small hardware item such as the clutch mechanism, chain loop, bracket, or idle end. If the blind still looks good and the fabric bands overlap correctly when guided by hand, a parts-based repair is normally the better value.
You should lean toward replacing the whole Daylight blind when the fabric has stretched enough that the sheer and opaque bands no longer register neatly, when the tube is bent, or when multiple parts have failed after years of sun exposure. A full replacement also makes more sense if the blind is very low-cost, badly stained, or no longer matches the room. But if the issue is isolated and mechanical, a repair kit or a few targeted parts is usually the smarter fix.

Yellow Daylight Blind
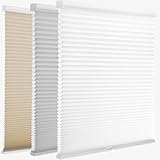
MYshade 1.5-Inch Cellular Cordless Light Filtering Shades, Honeycomb Window Blinds for Soft Daylight & Privacy, Thermal Insulation, Child Safe, Inside or Outside Mount (34" W x 64" H, White)

MYshade Cordless Light Filtering Cellular Shades for Indoor Windows, Honeycomb Window Blinds with Color-Matched Headrail, Easy Lift Shades for Bedroom, Living Room & Office, Beige, 27" W x 72" H
How to Prevent Parts Damage to Daylight Blind
- Use smooth, even pulls on the chain: Daylight blinds work best when the chain is pulled in a controlled motion so the layered fabric wraps evenly around the tube. Sharp jerks put extra strain on the clutch teeth and chain connector.
- Stop adjusting as soon as the bands align: Once the sheer and solid stripes reach the exact light-filtering position you want, do not keep tugging. Over-pulling is a common reason Daylight blind clutches start slipping or wearing prematurely.
- Keep the blind fully level in its brackets: A slight tilt at installation can gradually damage the idle end and bracket slots because the blind’s layered wrap shifts toward one side every time it rolls. Re-tighten loose brackets early before that wear spreads.
- Clean dust off the chain and control side regularly: Dust buildup around the control mechanism can increase friction over time. A light wipe of the chain and bracket area helps the blind move more freely and reduces strain on the internal drive parts.
- Do not force the blind when fabric starts bunching: If the striped layers begin wrapping unevenly, stop and check the tube, end caps, and side supports first. Forcing a Daylight blind while it is skewed can crack the tube insert or idle end.
- Protect heavily sunlit windows from heat-related part fatigue: Strong sun can dry out cheaper plastic parts, especially on the control side. If your blind faces intense afternoon sun, inspect the brackets and clutch housing more often for brittleness.
- Replace small worn parts before they stress larger ones: A stretched chain or loose end cap seems minor, but on a Daylight blind it can throw off the roller balance and wear out the clutch faster. Early replacement is usually cheaper than full repair later.
- Store spare matching hardware for hard-to-find blinds: If your Daylight blind uses uncommon fittings, keeping a spare parts set on hand can save time and keep a small issue from turning into a full blind replacement.
Daylight Blind Parts FAQ
What is the most common replacement part on a Daylight blind?
The most common replacement part is usually the clutch mechanism because it handles the daily lifting, lowering, and stripe alignment. After that, the control chain, idle end, and brackets are the next most common hardware failures.
Why are the stripes on my Daylight blind no longer lining up?
Misaligned stripes usually point to a mechanical issue rather than a fabric problem. A slipping clutch, worn tube insert, bent bracket, or damaged idle end can let the roller turn unevenly so the sheer and opaque bands stop overlapping properly.
Can I replace just the chain on a Daylight blind?
Yes, if the chain is the only damaged part. If the blind still moves smoothly and holds position correctly, a new beaded control chain may be enough. If it still slips afterward, the clutch is probably worn too.
Are Daylight blind parts universal?
No, many are not fully universal. Tube diameter, bracket style, side orientation, and drive shape all matter. That is why measuring the roller tube and comparing the old part visually is so important before ordering replacements.
Should I buy a repair kit or individual Daylight blind parts?
Buy individual parts if you know exactly what failed, such as a broken chain or cracked bracket. Buy a repair kit if you are troubleshooting an older blind or want several common components available at once.
When is a Daylight blind beyond repair?
A Daylight blind is usually beyond practical repair when the fabric is badly frayed, the roller tube is bent, the striped bands no longer register even with correct hardware, or several key parts are broken and replacements cost nearly as much as a new blind.
Can missing bottom bar caps affect how a Daylight blind works?
Yes. Missing bottom bar end caps can let the lower rail sit unevenly, rub against the frame, or shift the fabric hang. On a Daylight blind, that lower imbalance can make the striped bands look crooked during operation.
Where can I buy Daylight blind replacement parts online?
You can usually find them through dedicated blind part sellers, eBay listings, and Amazon search pages for items like Daylight blind parts, clutches, chains, brackets, and repair kits.
60 PCS Vertical Blind Repair Tabs Kit Clear Fixer Verticle Blinds Snap in Replacement Slats Parts Panels

#560 Universal Roller Shade Replacement Parts, Roller Blind Fitting Repair Kit for 1.5"(38mm) Tube with R16 Clutches, Metal Bracket, and End Plug
