
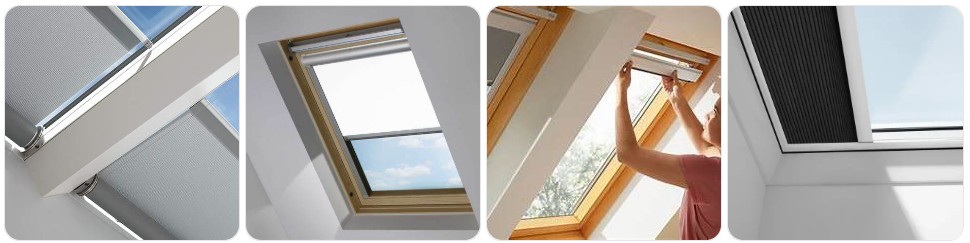
Removing a roof blind takes a little more care than removing a standard wall-mounted blind because the blind is usually fitted overhead, under tension, or secured inside side channels on a roof window frame. The quick answer is that most roof blinds come down by fully opening or stabilizing the blind first, supporting the cassette or headrail, then releasing the fixing clips, screws, pins, or side-channel connections in the correct order so the blind does not drop or twist. Before you begin, it also helps to look at Roof blind parts so you know which brackets, side channels, handles, tension cords, end caps, and fixings may need inspection or replacement once the blind is removed.
What You Need Before Removing Roof Blind
- A safe step ladder or platform: Roof blinds are mounted higher than standard window blinds, often at an angle or overhead, so you need stable access that lets you work with both hands while keeping the blind supported.
- A second person if the blind is wide or cassette-mounted: Larger roof blinds can twist when one side is released first. Extra support is especially helpful for blackout roof blinds, framed skylight blinds, and cassette systems with side channels.
- The right screwdriver set: Many roof blinds are secured with small screws in the side channels, end brackets, or cassette housing. A precision screwdriver set or small flathead and Phillips screwdriver set is often the most useful starting point.
- A plastic pry tool for clip covers: Some roof blinds have trim caps or clip-on covers hiding the fasteners. A plastic pry tool set helps lift those covers without marking the painted frame or scratching the blind cassette.
- A small container for screws and end caps: Roof blind fittings are often small and easy to lose, especially when working overhead. Keep side-channel screws, clip covers, end stops, and mounting brackets together as soon as they come off.
- A soft cloth or padded surface nearby: Once removed, the roof blind should be placed flat right away so the cassette, fabric, pleats, or side rails do not get bent or scuffed.
- Painter’s tape for labeling left and right parts: Roof blind side channels and brackets are often side-specific. A quick label can save time if you plan to reinstall the blind after cleaning, decorating, or a repair.
- Replacement fixings or repair parts if the blind already feels loose: If the handle is worn, the side channels are bent, or the mounting clips look damaged, it is smart to compare roof blind replacement parts before removal so you are ready if something needs changing.
Roof Blind Removal Guide
Roof blinds are usually fitted more tightly than standard vertical or roller blinds because they have to stay secure on an angled or overhead window. The safest way to remove one is to support the blind first, identify whether it uses side channels, clip-in brackets, tension cords, or screw-fixed cassette mounts, and then release the fittings in a controlled order so the blind does not spring, twist, or fall. Never pull the blind down by the fabric handle alone, because the load should be taken by the cassette, frame, or fixing points instead.
- Inspect how the roof blind is mounted: Look closely at the top cassette, side channels, and lower bar before starting. Some roof blinds are screw-fixed into side rails, some clip into brackets, and some use tensioned side cords or guide wires. Knowing which system you have is the key to taking it down cleanly.
- Move the blind into the safest working position: For many roof blinds, that means fully opening the blind into its cassette or placing it in a controlled position where the fabric is not loose. This reduces the chance of the blind sagging or creasing while you work overhead.
- Support the cassette or headrail before undoing anything: Roof blind cassettes can drop unexpectedly once the last fixing is released. Use one hand to support the frame of the blind, not just the bottom bar or fabric panel.
- Remove any visible trim caps or cover pieces: If the fixing screws are hidden, use a plastic pry tool to lift the cover pieces gently. Do not force them off with a large metal screwdriver because roof window frames and blind cassettes can mark easily.
- Release the side channels or guide wires first if required: Many roof blinds use side channels to keep the fabric aligned on an angled window. Remove the screws, clips, or end retainers holding those channels in place, or loosen the guide wires if your blind uses them.
- Undo the main cassette fixings carefully: Use the correct driver from your screwdriver set to remove the screws or release clips that hold the top cassette. If the blind is wide, have another person support the opposite end so it does not twist.
- Lower one side slightly, then support the full width: If the cassette releases from one side first, do not let it hang there. Bring the other side free promptly while supporting the full blind so the cassette stays straight.
- Take down the blind in one controlled movement: Once all fixings are free, lower the roof blind slowly and keep the fabric, pleats, and frame aligned. This is especially important for blackout roof blinds and pleated roof blinds, which can crease or skew if handled unevenly.
- Inspect the brackets, channels, and moving parts: After removal, check for bent side channels, worn handles, frayed cords, loose screws, damaged end caps, or cracked cassette clips. If needed, compare roof blind handles, roof blind brackets, and roof blind repair kits before reinstalling.
- Store the blind flat and keep all hardware together: Place the blind on a clean bed, table, or protected floor area. Put every screw, clip, cover, and bracket into a container immediately so nothing gets lost before reinstallation.

Ninehaoou 2 Set Wand Wire and Sleeve Collar for Horizontal Mini Blinds Wand Replacement with Hook Window Blind Repair Parts with 1 Inch Square Headrails for Window Opener Accessory

Bross Auto Parts BSR501FBA Sunroof Curtain Linkage Slider Blind Clips A2118950105 A2118950205 Compatible With Mercedes C W203 E W211

YXYYXY Cord Stop Housing and Knob Compatible with Hunter Douglas, Blinds Replacement Parts Fits Classic Duette Honeycomb Shades & Applause Window Treatments (3 Piece Set,White)
Common Problems When Taking Down Roof Blind
- The cassette feels stuck even after removing screws: This often means a hidden clip, trim cover, or side-channel retainer is still holding one section in place. Roof blinds are commonly secured at more than one point, so check both sides carefully before pulling harder.
- One side channel comes free but the other side stays fixed: This can happen when the blind frame is slightly twisted or when one side has an extra retaining clip. Support the cassette and release the remaining side gradually instead of forcing the blind sideways.
- The fabric starts sagging or folding awkwardly: Roof blind fabric can lose alignment if the bottom bar hangs unevenly during removal. Keeping the blind in a controlled position and lowering it evenly helps prevent creasing.
- Small screws or end caps drop while working overhead: Because roof blinds are removed above head height, lost hardware is common. A magnetic tray or small parts container can make the job much easier.
- Side channels look bent after removal: Roof blind channels can deform if the blind was forced out of them or if the frame was already under stress. If they no longer sit straight, compare roof blind side channels before reinstalling.
- The handle or pull bar feels loose: This may not stop removal, but it is a sign the blind may need fresh hardware. Looking at replacement handles for roof blinds can help if the operating bar no longer feels secure.
- Tension cords or guide wires snap back: Some roof blinds use side tension to keep the fabric tracking correctly. These should be released gradually rather than unhooked abruptly.
- The blind was already uneven before removal: That often points to a bracket, cassette, or side-channel issue rather than just a fitting problem. It is worth inspecting the full mounting system before putting the blind back up.
What to Do After Removing Roof Blind
- Lay the blind flat immediately: Roof blinds are easier to damage once off the window because the cassette, side rails, and bottom bar are no longer supported by the frame.
- Inspect the mounting points on the roof window: Check for stripped screw holes, loose brackets, damaged trim caps, or frame wear that may have caused the blind to sit unevenly.
- Clean the cassette, side channels, and frame edges: Dust buildup inside the channels or around the headrail can affect how smoothly the roof blind moves when reinstalled.
- Check the blind fabric or pleated material for edge wear: Roof blinds often get more sun exposure than standard blinds, so fading, frayed edges, or heat-related warping are worth spotting now.
- Replace worn hardware before refitting: If the clips are weak, the handle is cracked, or the side channels are damaged, compare roof blind repair kits and replacement parts for roof blinds before reinstalling the blind.
- Keep left and right fittings separated: This matters more with roof blinds than many standard blinds because side rails, end brackets, and guide pieces are often shaped for a specific side.
- Decide whether the blind should be reinstalled, repaired, or replaced: If the blind came down because it was jamming, sagging, or no longer staying square in the channels, this is the best time to fix the underlying hardware issue rather than refitting the same worn setup.

Hoeflife Cellular Shades Cordless Blackout, Skylight Blinds for Windows Roof Window Shades for Home, Room Darkening Honeycomb Blinds for Doors - Custom Cut to Size(Blackout, Black)
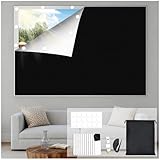
Blackout Curtains for Bedroom, Portable Blackout Window Cover Black Out Shades Blinds No Drill Cuttable Black Out Curtains, for Sloped Roof Windows, Children's Room, Bedroom, Media Room, 39x57 Inch

MiLin Blackout White Skylight Blinds Cordless Cellular Shades for Windows
Roof Blind Removal FAQ
How do you remove a roof blind without damaging it?
The safest method is to support the cassette or headrail first, release the side channels or retaining fittings in the correct order, and lower the blind evenly instead of pulling it down by the fabric or handle alone.
Do all roof blinds come down the same way?
No. Some roof blinds are clip-fixed, some are screw-mounted, and others use side channels or tensioned guide systems. Always check how your specific blind is mounted before trying to remove it.
Should the roof blind be open or closed before removal?
In many cases it is safest to place the blind in a controlled position, often fully opened into the cassette or otherwise stabilized, so the fabric is not hanging loose while the fittings are released.
Why is my roof blind stuck after I remove the visible screws?
Roof blinds often have hidden clips, trim covers, or side-channel retainers in addition to the visible screws. If the blind still feels fixed, check both ends and the side rails before using more force.
Can I remove a roof blind by myself?
Yes, some smaller roof blinds can be removed by one person, but wide or cassette-heavy blinds are much easier and safer with a second person supporting the opposite side.
What tools do I need to take down a roof blind?
A stable step ladder, a small screwdriver set, a plastic pry tool for covers or clips, a container for screws, and a padded surface for the removed blind are the most helpful items.
What should I inspect after removing a roof blind?
Check the brackets, cassette, side channels, handle, screws, guide wires or cords, and the blind fabric itself. Those are the parts most likely to cause jamming, sagging, or uneven operation.
What if the roof blind was already sagging or uneven before removal?
That usually points to worn channels, brackets, cords, or fixings rather than a simple installation problem. It is best to inspect and replace the worn parts before putting the blind back up.
Summary
Taking down a roof blind is mainly about controlling the blind’s weight, releasing the fittings in the right order, and protecting the cassette, side channels, and fabric while the blind comes free from an angled or overhead window. Because roof blinds often rely on purpose-made brackets, guide channels, tension systems, and compact cassette mounts, they should be removed carefully rather than pulled away from the window frame. After removal, inspect the channels, brackets, handles, cords, and frame fixings, clean the mounting area, and replace any worn hardware before reinstalling. If the blind keeps jamming, sagging, or sitting unevenly, it may also help to see how to repair Roof blinds before deciding whether to replace the whole setup.

60 PCS Vertical Blind Repair Tabs Kit Clear Fixer Verticle Blinds Snap in Replacement Slats Parts Panels

#560 Universal Roller Shade Replacement Parts, Roller Blind Fitting Repair Kit for 1.5"(38mm) Tube with R16 Clutches, Metal Bracket, and End Plug
