
Removing temporary blinds is usually quick because most are designed for short-term use, lightweight coverage, and easy installation without permanent hardware. In most cases, the safest way to take them down is to support the blind with one hand, loosen the adhesive, clips, or temporary fasteners slowly, and avoid pulling the material sharply away from the glass or frame. If you are removing the blind because it has torn, the adhesive strip has failed, or a clip has gone missing, it also helps to check Temporary blind parts before you begin so you can decide whether the blind can be reused, repaired, or should simply be replaced.
What You Need Before Removing Temporary Blind
- A stable step stool if the blind is mounted high: Temporary blinds are often installed directly at the top of the window frame, so safe access helps you peel or unclip them evenly instead of tugging from one side.
- A thin plastic scraper or non-marring pry tool: If the temporary blind is held on with adhesive strips, a plastic scraper tool or plastic pry tool set can help lift the edge gently without scratching painted trim or the glass.
- A hair dryer or gentle heat source for adhesive-mounted styles: Many temporary paper blinds and stick-on temporary blinds release more cleanly when you warm the adhesive first. A compact hair dryer can make removal much easier.
- A clean towel or drop cloth: Temporary blinds are usually lightweight paper or thin pleated material, so setting them down on a clean surface helps prevent crushing, creasing, or picking up dirt if you want to reuse them.
- Adhesive remover for stubborn residue: Some temporary blinds come off cleanly, but others leave behind sticky strips on painted frames or glass. Keeping an adhesive remover for window residue nearby can save time after removal.
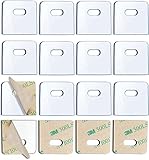
- Replacement clips or re-fastening supplies if you plan to reuse the blind: If the blind uses clips rather than full adhesive backing, it can help to compare temporary blind clips or double-sided mounting tape for blinds before taking it down.
- A storage band or light string tie: If your temporary blind is still usable, loosely securing it after removal can keep the pleats aligned until you reinstall it in another room or window.
Temporary Blind Removal Guide
Before removing a temporary blind, check how it is attached. Some temporary blinds are held with adhesive strips across the head, some use light clips, and others are trimmed-to-fit paper pleated blinds that stick directly to the window frame. The biggest mistake is pulling down too fast, which can rip the blind, tear the top rail area, or strip paint from the mounting surface. Work slowly, release the attachment point a little at a time, and keep the pleats supported so the blind does not collapse or tear while you take it down.
- Check whether the blind is adhesive-mounted or clip-mounted: Look closely at the top edge of the temporary blind. Most temporary blinds are either attached with peel-and-stick adhesive or held in place with lightweight clips. Identifying the mount type first prevents unnecessary force.
- Open or lower the blind into a manageable position: If it is a pleated temporary blind, keep the folds neat and avoid letting the full weight hang from one corner. For cut-to-fit paper blinds, a lightly compressed position is often easiest to handle.
- Support the top edge with one hand: Temporary blinds are light, but the top section can tear quickly if the adhesive releases unevenly. Hold the blind close to the mounting area rather than pulling from the bottom rail.
- Warm the adhesive if needed: If the blind is stuck firmly to the frame, use a hair dryer on low heat for a few seconds along the top strip. This helps soften the adhesive and reduces the chance of pulling paint, finish, or paper fibers away with the blind.
- Start at one corner and peel slowly: Use your fingers or a plastic scraper tool to lift one corner of the mounting strip. Peel across the width little by little instead of pulling straight down from the center.
- Release clips gently if your blind uses them: Some temporary blinds use simple support clips or lightweight brackets. Ease the blind free without twisting the pleated head area, since that is often the part most likely to split.
- Keep the pleats aligned as the blind comes off: Temporary blinds made of paper or thin fabric can crease badly if they fold sideways during removal. Support the blind evenly so the pleats stay stacked and straight.
- Set the blind on a clean flat surface: Place it on a towel, table, or clean floor area. If you plan to reuse it, avoid crushing the pleats or resting heavy tools on top of it.
- Remove leftover adhesive from the window frame: If sticky residue remains, wipe it away carefully using a soft cloth and an adhesive remover. Test any product on an inconspicuous area first if the frame is painted or finished.
- Decide whether the blind is reusable or disposable: Many temporary blinds are meant for short-term use, so small tears at the head or weak adhesive may make reinstallation unreliable. If the pleats are still intact, you may be able to reuse it with fresh tape or clips.

60 PCS Vertical Blind Repair Tabs Kit Clear Fixer Verticle Blinds Snap in Replacement Slats Parts Panels
SOGEWO (16 Set/32 Pieces) Clear Vertical Blind Repair Tabs, Vertical Blinds tabs/Blind Fixers for Vertical Blinds Replacement Slats & Parts

Vercraft 2 Pcs Vertical Blind Wand Control Replacement Repair Accessories White Window Blinds Replacement Parts
Common Problems When Taking Down Temporary Blind
- The top edge tears during removal: This is one of the most common problems with temporary blinds, especially paper pleated styles. It usually happens when the blind is pulled downward too quickly instead of peeled across from one corner.
- Adhesive strips leave residue on the frame: Some temporary blinds come away cleanly, but others leave a sticky line behind. A residue remover or plastic scraper can help clean the area without scratching it.
- The blind loses its pleat shape: Temporary blinds are lightweight, so the pleats can flatten or buckle if the blind is grabbed from the middle or dropped onto the floor.
- Paint or finish starts lifting with the adhesive: This can happen on delicate trim, older paint, or surfaces that were not fully cured when the blind was installed. Gentle heat and slow peeling help reduce the risk.
- Clip-mounted temporary blinds pop free suddenly: If the clips release at once, the blind can drop and crush the lower pleats. Support the full width as you unclip it.
- The blind cannot be reused after removal: Many temporary blinds are designed as short-term window coverings, so once the original adhesive weakens or the top section bends, rehanging may require fresh mounting tape or replacement clips.
- The blind was cut too tightly to the frame: A temporary blind trimmed with no clearance can catch on the frame during removal and tear at the corners. Pulling it straight out without checking the side edges often makes the damage worse.
What to Do After Removing Temporary Blind
- Inspect the blind before deciding to keep it: Check the top edge, pleats, and any included clips. If the mounting area is torn or badly bent, the blind may not hang evenly again.
- Clean off all residue from the window area: Temporary blinds often leave behind adhesive dust, paper fibers, or sticky strips. Cleaning the surface now makes future installation easier whether you use another temporary blind or a more permanent window covering.
- Store reusable temporary blinds flat and dry: If the blind is still in good shape, keep it away from moisture and do not place heavy items on it. Temporary paper blinds crush easily once removed.
- Replace missing clips or mounting supplies before reinstalling: If the original fasteners were damaged, compare temporary blind clips or fresh mounting tape before putting the blind back up.
- Consider whether a temporary blind is still the right solution: If the blind was only meant for moving, decorating, or short-term privacy, this may be the right time to replace it rather than reinstall a worn one.
- Measure the window again if you plan to fit a new one: Temporary blinds are often trimmed by hand, so rechecking the width can help you avoid installing the next blind too tightly or unevenly.
- Decide whether to repair or replace: If the issue is only a small mounting problem, the blind may still be usable. If the pleats, top edge, or adhesive area are badly damaged, replacement is often more practical than trying to save it.

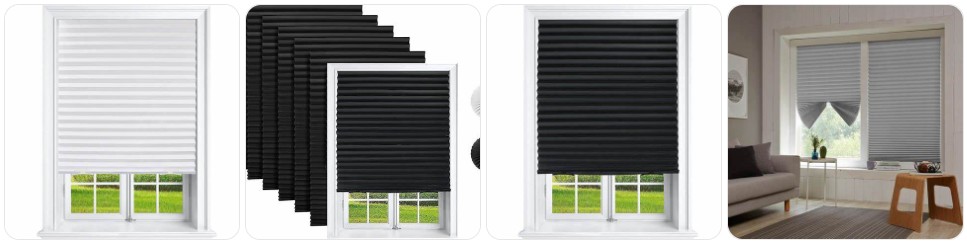
Window Blinds Cordless No Drill Cut to Size Clip On Stick On Self Adhesive Temporary Blinds Pleated Paper Blinds for Windows Doors Shades for Home Nursery Bedroom Kitchen Bathroom

Window Blinds Cordless Blackout No Drill Cut to Size Clip On Stick On Self Adhesive Temporary Blinds Pleated Paper Blinds for Windows Doors Shades for Home Nursery Bedroom Kitchen Bathroom
Window Blinds Cordless No Drill Cut to Size Clip On Stick On Self Adhesive Temporary Blinds Pleated Paper Blinds for Windows Doors Shades for Home Nursery Bedroom Kitchen Bathroom
Temporary Blind Removal FAQ
How do you remove temporary blinds without damaging them?
The safest method is to support the blind near the top, soften the adhesive if needed, and peel it away slowly from one corner instead of pulling straight down. This helps protect the top edge and keeps the pleats aligned.
Can temporary blinds be reused after taking them down?
Sometimes. If the pleats are still straight and the top section is not torn, some temporary blinds can be reused with fresh mounting tape or replacement clips. However, many are designed mainly for short-term use and may not rehang neatly after removal.
Do temporary blinds leave marks on the window frame?
They can. Adhesive-backed temporary blinds sometimes leave sticky residue or lift dust, paint, or finish from delicate surfaces, especially if they have been installed for a long time.
What is the best tool for taking down temporary blinds?
A plastic scraper, plastic pry tool, or similar non-marring tool is usually best because it helps lift the adhesive or edge gently without scratching the frame or glass.
Should I use heat to remove temporary blinds?
Yes, gentle heat can help when the blind is attached with adhesive. Warming the top strip with a hair dryer on a low setting often makes the adhesive easier to release cleanly.
Why did my temporary blind tear while I was removing it?
This usually happens when the blind is pulled down too quickly, the adhesive is too strong, or the top rail area is already weakened. Peeling across the width more slowly reduces the chance of tearing.
Can I remove a temporary blind without taking off the clips?
Yes, if the blind itself slides or lifts free from the clips. In some temporary setups, the clips can stay in place while only the blind is removed.
Is it better to repair a temporary blind or replace it?
That depends on the damage. Minor issues like weak mounting tape or a missing clip are often easy to fix, but if the top edge is ripped or the pleats are badly crushed, replacement is usually the simpler option.
Summary
Taking down temporary blinds is mainly about releasing the adhesive or clips slowly, supporting the lightweight pleated material, and preventing the top edge from tearing during removal. If you warm stubborn adhesive, keep the blind aligned as it comes off, and clean the window area afterward, the job is usually simple and low-risk. If your next step is fixing a worn mounting strip, replacing clips, or deciding whether the blind is still worth keeping, it is worth checking repair Temporary blinds before you buy a full replacement.
60 PCS Vertical Blind Repair Tabs Kit Clear Fixer Verticle Blinds Snap in Replacement Slats Parts Panels

Vertical Blind Repair Vane Savers, 12PCS Metal Vertical Blind Repair Tabs, Vertical Blinds Repair Kit for Vertical Blinds Replacement Slats
