
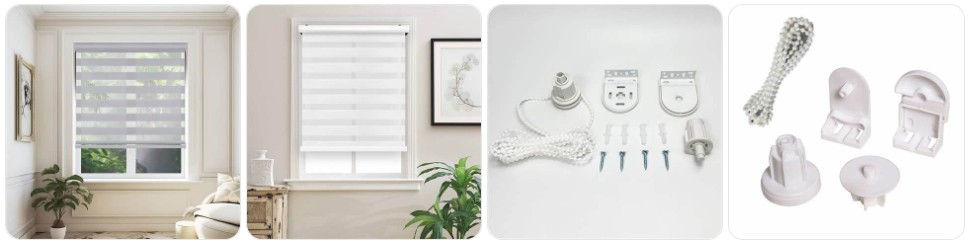
Sheer Blind replacement parts are often enough to fix uneven striping, slipping chain operation, or a blind that no longer raises and lowers smoothly. In most cases, you do not need to replace the full blind right away. The most common fixes involve the clutch, idle end, chain loop, brackets, bottom bar hardware, or a small sheer blind replacement parts set on Amazon. The guide below explains which parts usually fail, how to identify the right match, and when a full replacement makes more sense than repair.
Buy Sheer Blind Parts Online
The clutch is the main drive part that turns the roller tube and controls how the alternating sheer and solid bands line up. Replace it when the chain skips, binds, slips, or will not hold position consistently. » find on amazon / find on ebay
The idle end supports the opposite side of the tube and keeps the blind level inside the brackets. A worn or cracked idle end can cause sagging, crooked rolling, band misalignment, and rubbing at one end. » find on amazon / find on ebay
Brackets hold the clutch and idle end in the correct position so the fabric can roll squarely. Bent, loose, or wrong-size brackets often cause vibration, side-to-side play, or a blind that pops loose during operation. » find on amazon / find on ebay
A replacement bead chain loop restores smooth raising, lowering, and stripe adjustment when the original chain cracks, separates, or jams. Matching bead size and total loop length is important so the clutch engages properly every time. » find on amazon / find on ebay
Many sheer blinds use a wall-mounted tensioner to keep the control loop taut and safer. Replace it if the chain sags, jumps away from the clutch, or feels sloppy during the fine alignment needed for sheer bands. » find on amazon / find on ebay
Tube inserts connect the operating hardware to the roller tube and help the fabric roll evenly. If the insert cracks or no longer grips properly, the blind may turn unevenly and the stripes may drift out of alignment. » find on amazon / find on ebay
Bottom bar end caps protect the weighted hem bar and help the blind hang neatly. Missing caps can lead to scraping, exposed sharp corners, noisy movement, and a less stable lower edge on lightweight sheer fabric. » find on amazon / find on ebay
A repair kit is the most practical choice when you need several small hardware pieces at once, such as a clutch, idle end, connectors, brackets, chain stops, or fasteners for restoring everyday operation quickly. » find on amazon / find on ebay
Signs You Need Replacement Parts for Your Sheer Blind
- The alternating bands no longer align evenly: If the sheer and solid stripes stop matching up correctly during opening and closing, the problem is often a worn clutch, loose tube insert, or shifting idle end rather than the fabric itself.
- The blind lowers but will not stay at the same privacy setting: When a sheer blind slowly drifts out of position after you adjust it, the clutch may be slipping internally. Replacing it is usually more effective than forcing the chain.
- The chain loop jumps, binds, or feels rough when changing stripe position: Sheer blinds rely on smooth incremental movement to line up the bands. A damaged replacement chain loop or cracked chain connector can make that fine control impossible.
- One side of the blind hangs lower than the other: A tilted roller tube usually points to a worn idle end, bent bracket, or poorly seated mounting hardware. This is especially noticeable on sheer blinds because the striped fabric reveals misalignment immediately.
- The fabric rolls crooked and rubs one bracket side: Unlike standard roller shades, sheer blinds show tracking problems quickly because the layered bands must overlap consistently. Crooked rolling often means the bracket spacing, insert, or support end needs replacement.
- The bottom bar taps the window frame every time you operate the blind: Missing end caps or loose lower hardware can make the weighted bar wobble more than it should, especially when the blind transitions between open sheer and closed privacy positions.
- The chain hangs too loose near the wall: A broken or missing tensioner can let the loop sag away from the mechanism, causing inconsistent engagement. Replacing the chain tensioner often restores smoother control.
- You hear clicking but the tube barely turns: That usually indicates internal wear where the clutch or tube insert connects to the roller. On sheer blinds, that kind of slipping shows up fast as band mismatch and uneven stopping points.

60 PCS Vertical Blind Repair Tabs Kit Clear Fixer Verticle Blinds Snap in Replacement Slats Parts Panels
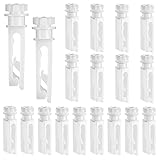
Vertical Blind Replacement Parts Repair Tabs White Stems for Window Carrier Vertical Blinds Curtain Accessories(12 Pieces)

Vercraft 2 Pcs Vertical Blind Wand Control Replacement Repair Accessories White Window Blinds Replacement Parts
How to Identify the Right Sheer Blind Replacement Part
- Start with the control side first: On a sheer blind, the most important match is usually the clutch side. Remove the blind, inspect the control end, and compare the shape, width, and insert style before ordering a replacement clutch.
- Check whether your blind is true sheer, zebra, dual sheer, or day-and-night style: Many sellers group these names together, but hardware dimensions can still vary. Use the blind’s striped fabric layout and tube setup to match parts to the exact operating system.
- Measure the roller tube diameter carefully: Sheer blind parts often fit specific tube sizes such as 28mm, 38mm, or larger cassette-style systems. A clutch or idle end that looks close can still fail if the insert diameter or tube profile is wrong.
- Look at how the chain engages the clutch: Count the bead size, inspect whether the loop uses plastic or metal beads, and note the gear width. This matters because sheer blinds depend on precise incremental movement for stripe alignment, not just basic up-and-down travel.
- Inspect the bracket style before buying hardware: Some sheer blinds use open brackets, some use spring-loaded pin supports, and others fit inside cassette systems. Matching the bracket type is essential if the blind has started popping free or sitting off-level.
- Compare the idle end pin shape and spring action: The support side may use a fixed pin, retractable pin, or shaped insert. A mismatch here can leave the roller loose, which then causes visible tracking issues across the layered sheer fabric.
- Check the bottom bar hardware too: If the blind operates but hangs untidy, measure the width and profile of the lower bar before buying bottom bar end caps or trim pieces. Small lower parts affect how the blind finishes and stabilizes.
- Use a repair kit when several small parts are questionable: If the blind has a worn clutch, stretched chain, and loose brackets all at once, a sheer blind repair kit is usually the easiest way to restore operation without chasing separate pieces one by one.
Should You Repair or Replace the Whole Sheer Blind?
Repair is usually the better choice when the fabric is still clean, the bands are not badly frayed, and the main issue is mechanical. Sheer blinds often fail at the clutch, chain loop, idle end, or bracket long before the full shade becomes unusable. In those cases, replacing a few targeted components or using a repair kit is usually cheaper and faster than ordering a completely new blind.
Replace the whole blind when the striped fabric has stretched unevenly, the sheer panels are torn, the bottom bar is badly bent, or the blind has multiple incompatible hardware failures plus obvious cosmetic wear. If the fabric bands no longer align even after you correct the mechanism, a new sheer blind may be the smarter long-term fix. The best rule is simple: repair hardware problems, replace fabric-and-structure problems.

AOSKY Light Filtering Roller Shades for Indoor Windows, 25"W x 72"H, White

Persilux Cordless Zebra Blinds for Windows Free-Stop Roller Windows Shades (24" W X 72" H, White) Dual Layer Light Control for Day and Night, Light Filtering Sheer Shades for Home, Easy to Install
Persilux Cordless Zebra Blinds for Windows Free-Stop Window Blinds (34" W X 64" H, White) Dual Layer Light Control for Day and Night, Light Filtering Sheer Shades for Home, Bedroom, Easy to Install
How to Prevent Parts Damage to Sheer Blind
- Keep the bands aligned before fully raising or lowering: With sheer blinds, forcing movement while the stripes are twisted or poorly aligned adds extra stress to the clutch and tube insert. A quick alignment check reduces strain on the operating side.
- Pull the chain smoothly instead of jerking it: Fast, sharp pulls are one of the most common reasons sheer blind clutches and chain connectors wear out early. Controlled movement is especially important because these blinds depend on precise layered positioning.
- Do not let the chain loop swing freely: A loose control loop can slap the wall, twist, or disengage unevenly from the gear. Installing a proper chain tensioner helps keep operation consistent and reduces clutch wear.
- Dust the fabric and hardware regularly: Fine dust around the tube, brackets, and bottom bar can increase drag over time. Sheer blinds show performance issues quickly because even small resistance changes can affect how the alternating bands line up.
- Make sure the brackets stay tight and level: If one bracket starts loosening from the wall or frame, the blind may begin rolling crooked. Tight hardware prevents side-loading on the idle end and reduces the chance of visible stripe drift.
- Avoid over-rotating the blind at the end of travel: Once the blind reaches its natural stop, extra pulling can damage the clutch or stretch the chain. This matters more on sheer blinds because users often keep adjusting to perfect the privacy setting.
- Check for early signs of rubbing at the edges: If the fabric starts brushing one side of the bracket or cassette, inspect the idle end and tube support before the friction causes bigger alignment problems or edge wear.
- Replace small worn parts before they damage larger ones: A cheap chain connector, end cap, or insert is far easier to swap than a complete blind. Keeping a few spare sheer blind parts on hand can prevent a simple issue from becoming a full replacement job.
Sheer Blind Parts FAQ
What is the most common replacement part on a sheer blind?
The clutch mechanism is usually the most commonly replaced part because it handles daily lifting, lowering, and stripe alignment. After that, chain loops, idle ends, and brackets are the parts that most often wear out or break.
Are zebra blind parts the same as sheer blind parts?
Often they are sold under overlapping names such as zebra, dual sheer, day-and-night, or vision blind parts, but they are not always identical. Tube size, bracket style, and clutch shape still need to be matched carefully before ordering.
Can I replace just the chain on my sheer blind?
Yes, if the clutch itself is still working properly and the only issue is a cracked, separated, or stretched loop. A matching replacement bead chain is often enough to restore smooth operation.
Why are the sheer and solid bands no longer lining up?
That usually points to a slipping clutch, worn tube insert, loose bracket, or damaged idle end rather than the fabric alone. When the roller no longer turns evenly, the striped layers stop overlapping in the correct open and closed positions.
Do I need to measure the roller tube before buying parts?
Yes. Tube diameter is one of the most important details when buying sheer blind hardware. Even if two parts look similar in photos, the wrong tube size can prevent the clutch or idle end from fitting or operating correctly.
When should I buy a repair kit instead of a single part?
A repair kit makes sense when your blind has more than one worn hardware issue, such as a slipping clutch plus a tired chain and loose brackets. It is often the easiest route when you want to refresh the whole operating system in one go.
Is it worth repairing an old sheer blind?
Usually yes, as long as the fabric bands are still in good shape and the damage is mainly mechanical. If the striped fabric is torn, badly stretched, or permanently misaligned, replacing the entire blind is often the better value.
Where can I buy sheer blind replacement parts online?
You can usually find the widest selection through online marketplaces by searching for the exact part type, tube size, and blind style. Start with Amazon sheer blind parts listings and compare them with eBay results for brackets, clutches, chains, and complete repair kits.
60 PCS Vertical Blind Repair Tabs Kit Clear Fixer Verticle Blinds Snap in Replacement Slats Parts Panels

#560 Universal Roller Shade Replacement Parts, Roller Blind Fitting Repair Kit for 1.5"(38mm) Tube with R16 Clutches, Metal Bracket, and End Plug
