
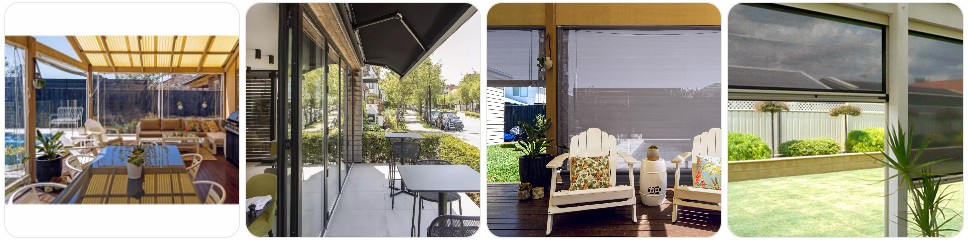
If you need to remove Bistro blinds without damaging the clear PVC panel, crank or strap hardware, bottom rail, or outdoor fixing points, the safest approach is to roll the blind into a controlled position, release the bottom securing points first, and then detach the top mounting hardware while supporting the weight evenly. Bistro blinds are different from indoor blinds because they are usually fitted outdoors on patios, verandas, pergolas, and café-style enclosures, so they often use heavier brackets, straps, bungees, zips, or channel-guided systems. This guide explains how to take down Bistro blinds step by step while protecting the weather-facing material and the outdoor mounting setup. If you think you may need hardware afterward, it also helps to review Bistro blind parts before you begin.
What You Need Before Removing Bistro Blind
- A stable ladder or step platform: Bistro blinds are often mounted higher than indoor blinds and can be awkward to handle outdoors, so steady access is important before you start releasing brackets or top fixings.
- A screwdriver or drill/driver: Many Bistro blind systems use screws, brackets, side clips, or retention hardware that are easier to remove with a cordless drill/driver or a basic hand screwdriver.
- Needle-nose pliers: A pair of needle-nose pliers can help with small retaining pins, bungee hooks, or stubborn outdoor fasteners that are hard to grip by hand.
- A clean tarp or soft surface: Once the blind comes down, lay it on a clean tarp or smooth surface so the clear PVC or tinted panel does not get scratched by grit, paving, or rough decking.
- Soft straps or loose ties: Use these to secure the blind once it is rolled. Do not pull the straps too tightly, because Bistro blind material can crease or mark if stored under too much pressure.
- A container for screws, clips, and brackets: Outdoor blind hardware is easy to lose once removed, especially if you are working in a breezy area or over decking gaps.
- Optional replacement hardware on hand: If the blind already looks worn, it may help to compare Bistro blind parts, outdoor blind brackets, or blind strap replacements before removal.
Bistro Blind Removal Guide
Bistro blind removal is safest when you treat it as an outdoor weather screen rather than a lightweight indoor blind. The material is usually heavier, the mounting points are often more exposed to weather wear, and the clear or tinted panel can scratch if it brushes against rough surfaces during removal. The easiest method is to release the lower securing points first, reduce the tension gradually, and then detach the upper roller or support hardware while keeping the blind controlled and evenly supported. If your Bistro blind uses side channels, guide wires, straps, or zip-track style edges, check the fixing method carefully before forcing anything loose.
- Choose a calm, dry time to remove the blind: Outdoor Bistro blinds are much harder to manage in wind or wet weather. A calm day makes it easier to keep the material clean and under control.
- Inspect the full setup before touching any hardware: Look at the top mounting points, bottom securing straps or clips, side channels, guide wires, and any crank or spring system so you understand what is holding the blind in place.
- Raise or position the blind so the panel is controlled: If the blind is partly down, bring it to a manageable position before removal. You want the material stable, not flapping or hanging under awkward tension.
- Release the bottom restraints first: Undo the straps, buckles, turn buttons, bungee hooks, or lower clips that hold the blind tight at the bottom. This is usually the first step because it removes the downward tension from the outdoor screen.
- Free any side guides or retention points: If the blind runs in side channels or uses guide wires, release those carefully before attempting to remove the top section. Do not twist the blind out of a side channel by force, because that can crack the edge welds or damage the channel system.
- Support the main roller or top bar with one hand: Before undoing upper brackets or pins, hold the blind securely so the weight does not drop suddenly when the final fixing comes loose.
- Remove the top mounting hardware gradually: Use your drill/driver or screwdriver to release the screws, pins, or clips holding the top assembly in place. On wider Bistro blinds, it often helps to have a second person support the opposite side.
- Lower the blind evenly and place it on a clean surface: Once the top section is free, bring the blind down in a controlled motion and lay it flat on a tarp or clean protected area right away.
- Roll and secure the blind loosely for storage: Roll the material gently so the clear or tinted panel stays smooth. Avoid sharp folds, tight ties, or heavy pressure on the stored blind.
- Inspect the hardware after removal: Once the blind is down, check the brackets, straps, bottom rail, fasteners, and side-retention parts for weather damage. If needed, compare Bistro blind parts, outdoor blind brackets, and blind strap replacements before reinstalling it.

60 PCS Vertical Blind Repair Tabs Kit Clear Fixer Verticle Blinds Snap in Replacement Slats Parts Panels

Vercraft 2 Pcs Vertical Blind Wand Control Replacement Repair Accessories White Window Blinds Replacement Parts
Vertical Blind Replacement Parts Repair Tabs White Stems for Window Carrier Vertical Blinds Curtain Accessories(12 Pieces)
Common Problems When Taking Down Bistro Blind
- The bottom straps or clips are harder to release than expected: Outdoor fittings often stiffen with weather exposure, so straps, buckles, and turn buttons may feel tighter than indoor blind hardware.
- The panel starts flapping as soon as the lower edge is released: This usually happens when removal is attempted on a windy day. Bistro blinds should be taken down in calm conditions whenever possible.
- The blind seems stuck in the side channel: Some Bistro blinds use guided systems that need to be released in a specific order. Forcing the panel sideways can damage the edge weld or guide channel.
- The top bar feels heavier than expected: Larger Bistro blinds can be surprisingly heavy because of the outdoor-grade material and mounting hardware. Wider blinds often need two people for safe removal.
- The clear panel gets scratched during removal: This usually happens when the blind is lowered onto rough paving, brick, or decking. A clean tarp or protected surface makes a big difference.
- The brackets or screws show rust or weather wear: This is a common issue with outdoor blinds and a good reason to compare outdoor blind brackets or replacement fasteners before reinstalling the same setup.
- The rolled blind develops pressure marks during handling: Bistro blind material should be rolled loosely, not folded tightly. Hard creases can be difficult to remove later.
What to Do After Removing Bistro Blind
- Lay the blind on a clean protected surface: Keep it away from dust, sharp edges, and rough outdoor ground so the panel stays clear and smooth.
- Inspect the PVC or mesh material closely: Check for cracks, cloudy spots, split stitching, edge damage, or fastening wear before you decide whether to reinstall the same blind.
- Check all outdoor hardware: This is the best time to inspect straps, buckles, brackets, channels, guide wires, and fasteners for rust or brittleness. If needed, compare Bistro blind parts and outdoor blind brackets.
- Clean the blind before storing it: Removing dust, pollen, and outdoor residue now helps prevent marks from setting while the blind is rolled up.
- Store the blind loosely rolled: Avoid tight straps or stacking heavy objects on top. Bistro blind material can crease or distort if it is stored badly.
- Label the hardware if you removed more than one blind: Outdoor enclosures often use matching blinds across a patio, so keeping each blind with its own brackets and fixings makes reinstallation much easier.
- Decide whether to repair or replace: If removal exposed worn straps, cracked brackets, or weather-damaged material, compare Bistro blind options with the cost of repair parts before reinstalling the same blind.


Bistro Blind Removal FAQ
Should I take down Bistro blinds in windy weather?
No. Bistro blinds are much easier and safer to remove in calm conditions because wind can make the panel flap, twist, or scrape against nearby surfaces.
What should I release first on a Bistro blind?
In most cases, start with the bottom securing straps, clips, or turn buttons, then move on to the side retention points and top fixings once the lower tension has been released.
Can Bistro blind material get damaged during removal?
Yes. Clear or tinted Bistro blind material can scratch, crease, or mark if it is dragged over rough surfaces, folded sharply, or stored under too much pressure.
Why does my Bistro blind feel stuck in the side channel?
Some Bistro blinds use guided or zip-style edge systems that need to be released in the correct order. If the panel is still under tension, it can feel jammed even though the lower fittings are already loose.
Do I need two people to remove a Bistro blind?
For wider or heavier Bistro blinds, yes, that is often the safer option. Large outdoor screens can be bulky, and supporting both ends evenly reduces the risk of twisting the top bar or dropping the blind.
Can I roll the blind tightly after removing it?
No. It is better to roll it loosely and secure it gently. Tight rolling or hard straps can leave pressure marks or distort the material.
What if the brackets or straps look weather-damaged after removal?
That is a good time to replace them before reinstalling the blind. Outdoor hardware wears faster than indoor hardware, and weak fittings can make the blind less secure the next time it is mounted.
Can I reinstall the same Bistro blind after taking it down?
Yes, as long as the material, brackets, straps, and mounting points are still in good condition. Removal is also a useful chance to clean the blind and replace worn outdoor hardware first.
Summary
Removing Bistro blinds safely is mostly about reducing tension in the outdoor screen, releasing the lower securing points first, and then supporting the top mounting system carefully so the blind comes down under control. Once the blind is off, you can clean it more easily, inspect the weather-exposed hardware properly, and decide whether it is ready to go back up or needs fresh fittings first. If your removal project turns into a repair job, it also helps to review repair Bistro blinds before reinstalling the blind.
60 PCS Vertical Blind Repair Tabs Kit Clear Fixer Verticle Blinds Snap in Replacement Slats Parts Panels

#560 Universal Roller Shade Replacement Parts, Roller Blind Fitting Repair Kit for 1.5"(38mm) Tube with R16 Clutches, Metal Bracket, and End Plug
